Learn Violin Online with Online Violin Teacher Meghan Faw Lesson 5/15: First finger notes
Now that you can successfully bow straight on open strings, it’s time to start using your left-hand fingers!
In violin playing, the fingers on your left hand correspond to certain numbers. The index finger is the first finger, the middle finger is the second finger, the ring finger is the third finger, and the pinky is the fourth finger. In this lesson, you’ll be practicing using just the first finger (the index).
Some students choose to use finger tapes or guides to help them learn where to place their fingers. Using finger tapes (or not) is completely a personal choice, but here are the pros and cons.
Pros:
The fingers will land in tune more of the time and therefore sound better
You’ll practice building up your muscle memory faster because you’ll be more accurate with your placements
Cons:
Some students may come to rely on them and have trouble taking them off
Students may have trouble truly learning where to place the fingers and how the spacing feels and instead just rely on the tapes
If you do decide to use them, I’d strongly recommend using individual tapes rather than a giant sticker. In my experience, the stickers are much less accurate than individual tapes. Click here to watch a video showing you how to put the individual finger tapes on your violin.
When placing your fingers down, they should be placed on the inside corner of the finger and on the tip. The knuckle should remain up (or “curly) and ideally the finger should directly land on the correct placement, rather than landing incorrectly and sliding up or down to the correct pitch.
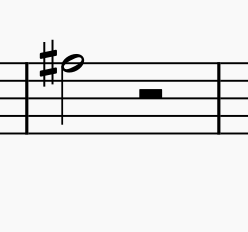
First finger on E string, F#
First finger on A string, B
First finger on D string, E
First finger on G string, A
Download additional violin first finger exercises here.


